How to setup Stable Diffusion on a Macbook and Generate of AI Images with cool Prompts without any internet connection
Since DallE-2 and Stable Diffusion launched, I have been super excited to try them out on multiple online websites, but I wanted to setup everything locally on my machine which should be easily accessible when I need to create a random Image. also play with some properties which stable diffusion provides, I was also reading about how we can set Dreambooth by Google to use Stable Diffusion and merge our real world samples Images into the generated Image context.
example I can provide my Images to the model and ask to create a version of me as Rambo, with Stable diffusion thats not possible because it does not know who I am. Things are getting pretty exciting on the AI domain, lets jump into setting things up on my local machine.
Setting Up Stable Diffusion on M1 Macbook.
- Make sure you have
Pythoninstalled andpiplatest installed. - Install miniforge to run python from here M1 silicon support https://github.com/conda-forge/miniforge
- after the
.shfile is installed I runbash Miniforge3-MacOSX-arm64.shfrom the terminal where file is downloaded. - after accepting a lengthy acceptance letter it installed at
/user/div/miniforge... - after accepting couple of more prompts on the terminal Miniforge is installed
- now in the new terminal I can use the command
conda(confirmed) - cloning the repo stable diffusion git clone https://github.com/lstein/stable-diffusion.git`
cd stable-defusion- cloning the weights now
- go to this link and make a hugging face account, this website stores the weights which are used to train the data models free for users (https://huggingface.co/CompVis/stable-diffusion-v-1-4-original)
- after creating the hugging face account accept the invitation email.
- download the weight from this link now: https://huggingface.co/CompVis/stable-diffusion-v-1-4-original/blob/main/sd-v1-4.ckpt
- THIS IS 4GB in SIZE!!!
- the file downloaded in 6 minutes, thanks to fibre connection.
- created a folder for the models in the stable-defusion folder.
mkdir -p models/ldm/stable-diffusion-v1/(looked into the folder and found we have a lot of other models as well)
- set
PATHfor the downloaded weights (in my case its downloaded to weights folder inside the repo folder)
PATH_TO_CKPT="/Users/div/Documents/Weekend-Projects/stable-diffusion/weghts"
- create a symlink to the model you just downloaded
ln -s "$PATH_TO_CKPT/sd-v1-4.ckpt" models/ldm/stable-diffusion-v1/model.ckpt
- Confirmed by going to
model/ldm/stable-diffusion-v1folder and can see a symlink namedmodel.ckpt - Prepare the environment now
CONDA_SUBDIR=osx-arm64 conda env create -f environment-mac.yamlThis command will take some time and show message as[CCollecting package metadata (repodata.json): -.. and other installation steps, no input needed from our side. this step took a long time, around 3-4 minutes in my case and downloaded /installed a lot of stuff.- I got an error like this
  note: This error originates from a subprocess, and is likely not a problem with pip.
  ERROR: Failed building wheel for tokenizers
ERROR: Could not build wheels for tokenizers, which is required to install pyproject.toml-based projects

failed

CondaEnvException: Pip failed
- I saw a comment online which mentioned installing
Rustis required - Installed rust with Rustup
curl --proto '=https' --tlsv1.2 -sSf https://sh.rustup.rs | sh- This above command installed successfully. needed to confirm 1 step while installation.
- tried the command again which failed ``CONDA_SUBDIR=osx-arm64 conda env create -f environment-mac.yaml`
- got an error now
CondaValueError: prefix already exists: /Users/div/miniforge3/envs/ldm - used this command to remove all the ldm packages :
conda env remove -n ldm - re-ran the command again
CONDA_SUBDIR=osx-arm64 conda env create -f environment-mac.yaml - Installation started again
- Got error again
ERROR: Failed building wheel for tokenizers
ERROR: Could not build wheels for tokenizers, which is required to install pyproject.toml-based projects

failed

CondaEnvException: Pip failed
- I checked again and tried to install rust again from this command
curl --proto '=https' --tlsv1.2 -sSf https://sh.rustup.rs | sh
as mentioned in this official link : https://www.rust-lang.org/tools/install
- This time I also restarted the terminal, as I thought that might be the issue of not able to find Rust due to path not loaded properly.
- again run
conda env remove -n ldmto remove the ldm packages before installing again CONDA_SUBDIR=osx-arm64 conda env create -f environment-mac.yamRun this again- ✅ PERFECT, this time it worked and installed all successfully.
- Now I need to activate the coda installed ldm packages with this command
conda activate ldm
- After this I run the Python script with this command
python scripts/preload_models.py- This step again took some time. it downloaded a bunch of stuff again.
- in the console i can see it downloads 1 big file called
pytorch_model.binwhich was around 1.3 GB. - It also installs
models from RealESRGAN and facexlib, which takes some time as well
- After a sweet
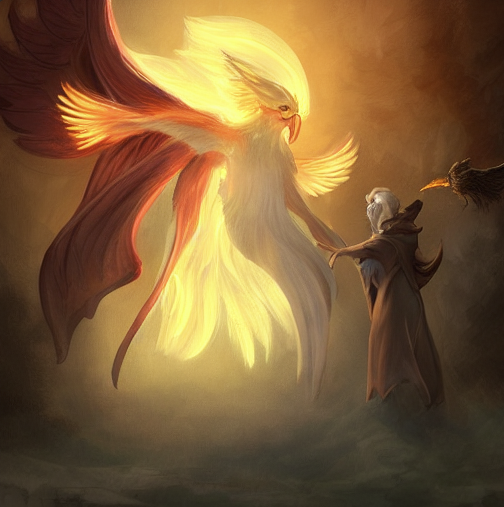
...successmessage on the terminal I move to next and final step. python scripts/dream.py --full_precisionafter running this command I can see a message in terminal as* Initializing, be patient...- I got a prompt which asked me to enter a phrase, I entered this
a curious phoenix watching a wizard study magic in a mages workshop, soft lighting, mythical phoenix, digital art trending on artstation -n 3
- The last
-n 3is for the number of Images we want to generate, I only wanted 3 samples everytime. - The System worked on Generating the image and took around 2-3 minutes to generate the Images, the CPU on my machine went to around 40% and RAM was completely full (Macbook pro M1, 32GB, 1TB config) , The fans started full blowing after some time.
- Here is the result


- I was so curious to write long prompts to generate such cool Images on my machine, the next sample is here
concept art of a jungle path leading to tree of life, religious, in the style of fenghua zhong and ruan jia and jeremy lipking and peter mohrbacher, mystical colors, rim light, beautiful lighting,k, stunning scene, raytracing, octane, trending on artstation
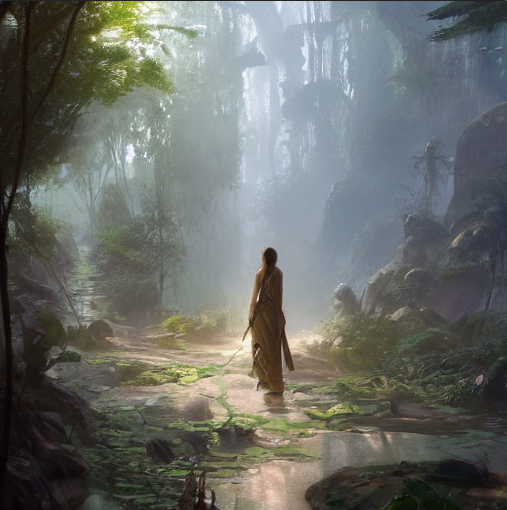
Wow, I see myself using this Image as my wallpaper.
In the next series I will try to setup Dreambooth.
🙏 Thanks for reading and setting up, please share your generated images to me via Twitter @divyanshunegi
X
Did this post help you ?
I'd appreciate your feedback so I can make my blog posts more helpful. Did this post help you learn something or fix an issue you were having?
Yes
No
X
If you'd like to support this blog by buying me a coffee I'd really appreciate it!
X
Subscribe to my newsletter
Join 107+ other developers and get free, weekly updates and code insights directly to your inbox.
Email Address
Powered by Buttondown


Divyanshu Negi is a VP of Engineering at Zaapi Pte.


X